2024.1.1
[English] All 10 ways to find out UDID of an iPhone or iPad
(This article was originally written in Japanese. Observing from Google Analytics that it has been accessed globally using translation tools, I have rewritten it in English.)
Every iOS device is assigned a UDID (Unique Device IDentifier), uniquely identifying the device. It’s a unique value different from the device’s serial number and not displayed in the Settings app.
The existence of UDID might be unfamiliar to those not involved in iOS app development. However, collecting the UDID of all target devices is essential when distributing test apps via AdHoc.
(Registering the UDIDs of devices belonging to stakeholders you want to grant app access is necessary.)
Although using TestFlight for test app distribution is recommended, there are instances where it could be more feasible due to various constraints or past issues.
In such cases, collecting UDID is still necessary, but it can be surprisingly cumbersome and bothersome. It would be ideal if you could do it all by yourself, but sometimes you have to ask those unfamiliar with handling Mac or Windows or who do not have high IT literacy, “Could you tell me the UDID of your device ?”
Therefore, in this article, I will introduce a complete guide to finding the UDID of iOS devices, covering all ten methods.
- (1) MDM (for IT Department)
- (2) Xcode (Mac / for Developers)
- (3) cfgutil (Mac / for Developers)
- (4) Apple Configurator (Mac)
- (5) Finder (Mac)
- (6) Music (Mac)
- (7) System report (Mac)
- (8) iTunes (Windows)
- (9) Device Manager (Windows)
- (10) UDID.tech (Web)
Let’s look at them in order.
(1) MDM (for IT Department)
The most efficient way to collect UDIDs is not to have everyone check their UDIDs but instead have you use MDM to find out everyone’s UDIDs.
MDM collects almost all information about the checked-in devices. Naturally, it also contains UDIDs so you can look up the UDIDs of all devices under MDM management with a browser.
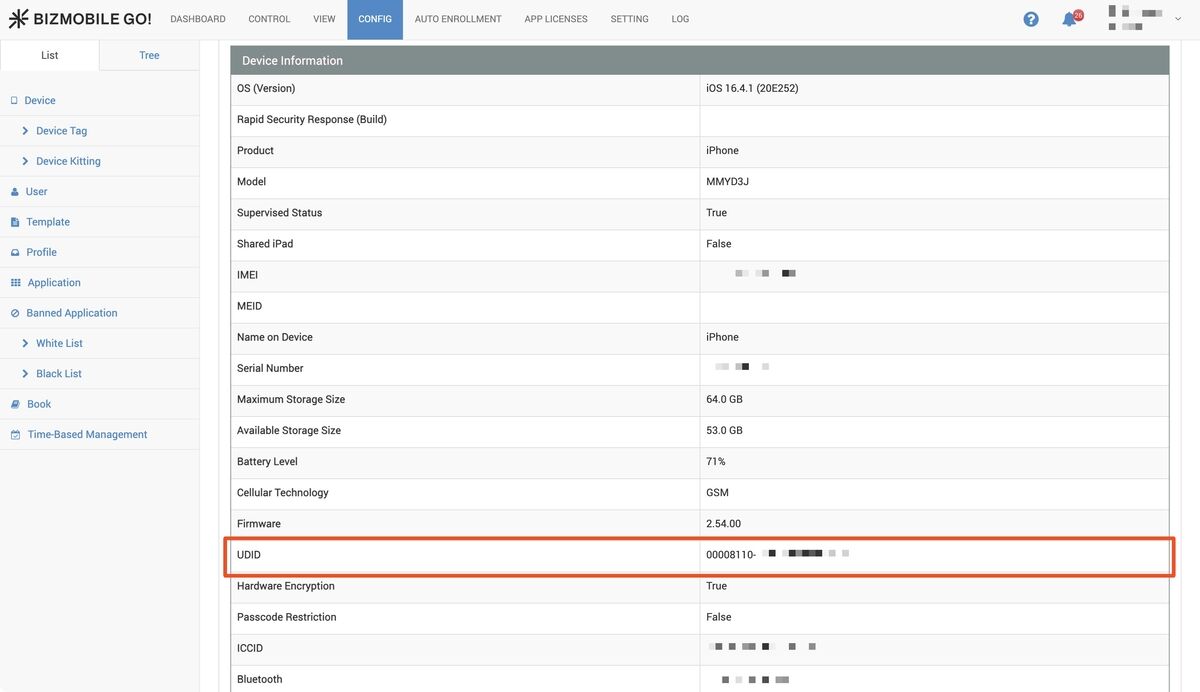
(The device information window in BizMobile Go!, an MDM solution developed by a Japanese company)
Many MDMs can export a device detail information list, including UDID, as a CSV file so that you can quickly create a list of UDIDs using Excel or Numbers.
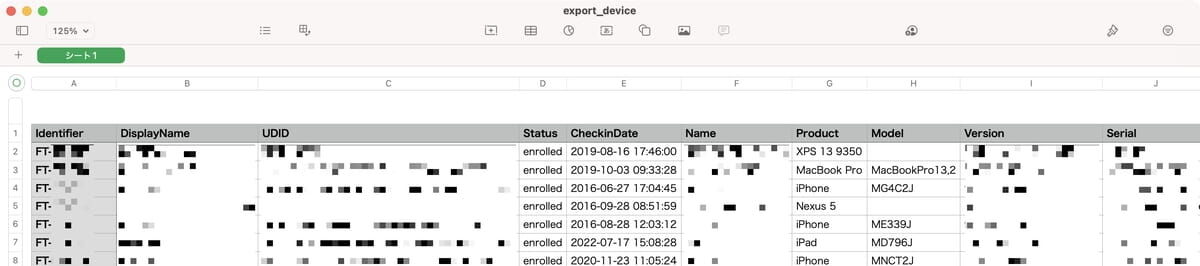
(Opening the CSV file. Quickly obtaining the list of UDIDs is straightforward.)
The initial step in UDID collection is to list the target UDIDs using MDM by the IT Department.
For devices not managed under MDM, it’s advisable to have their owners check each UDID subsequently.
It is also recommended for development companies and SIers to implement MDM in-house, especially since collecting UDIDs is a necessary step during the test phase via AdHoc distribution.
(2) Xcode (Mac / for developers)
If you are a developer, you can use Xcode. Click [Devices and Simulators] in the Xcode menu, and select the device you wish to display its details.
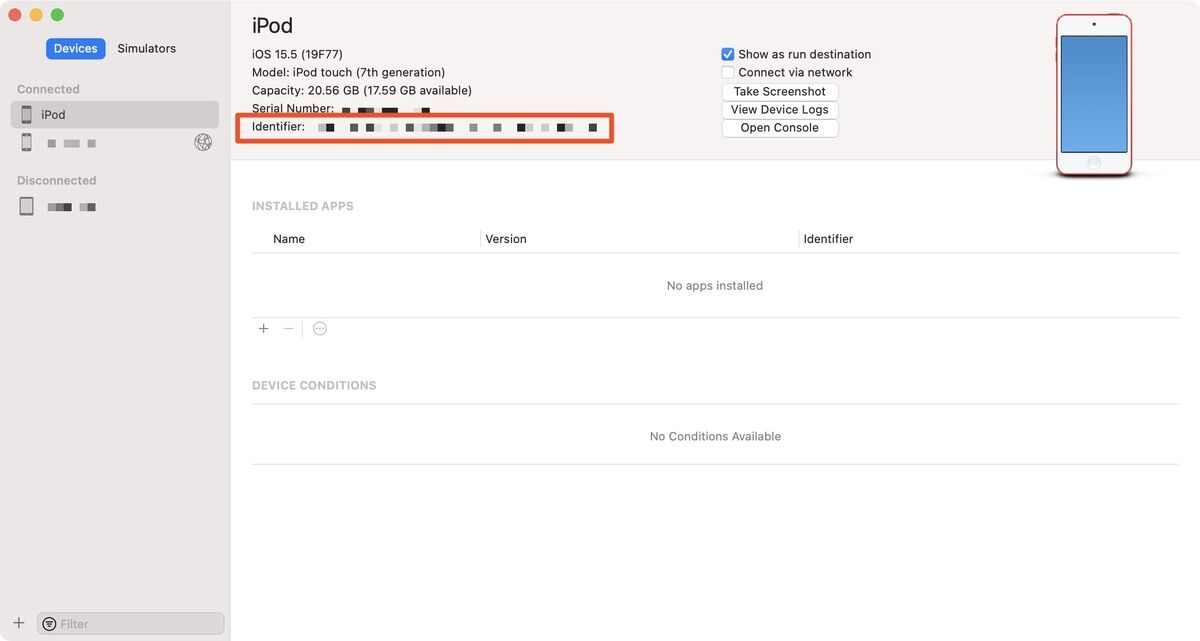
The Identifier in the red rectangle is the UDID. The shortcut [command] + [shift] + [2] is helpful to display this [Devices and Simulators] screen. By the way, you can also check the serial number on the same screen.
(3) cfgutil (Mac / for developers)
Developers familiar with terminal operations can use the cfgutil command to check UDIDs. You can display not only one device’s UDID but multiple devices’ UDIDs simultaneously via a USB hub.
Please connect an iOS device to a Mac via USB and run the following command.
$ cfgutil --format json list | jq .
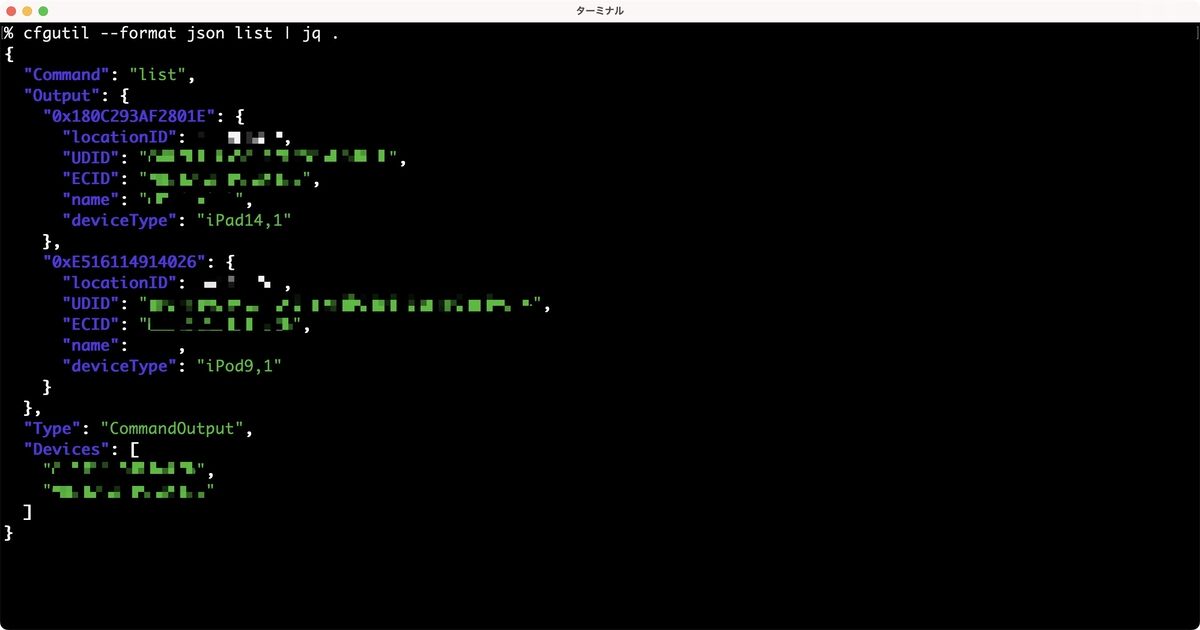
(Execute cfgutil list command. The jq command needs to be installed separately)
Note that cfguitl is a utility command that comes with Apple Configurator. If you are creative, for example, you can create a system that automatically sends an e-mail with the UDID to the person in charge by connecting a USB cable to a shared Mac within your company. (via cfgutil; exec command)
(4) Apple Configurator (Mac)
If you are a Mac user who is neither an IT professional nor a developer, you can use Apple Configurator.
First, connect your iOS device to your Mac via USB and launch Apple Configurator. Immediately after launch, you can see a list of devices connected to your Mac, as shown below.
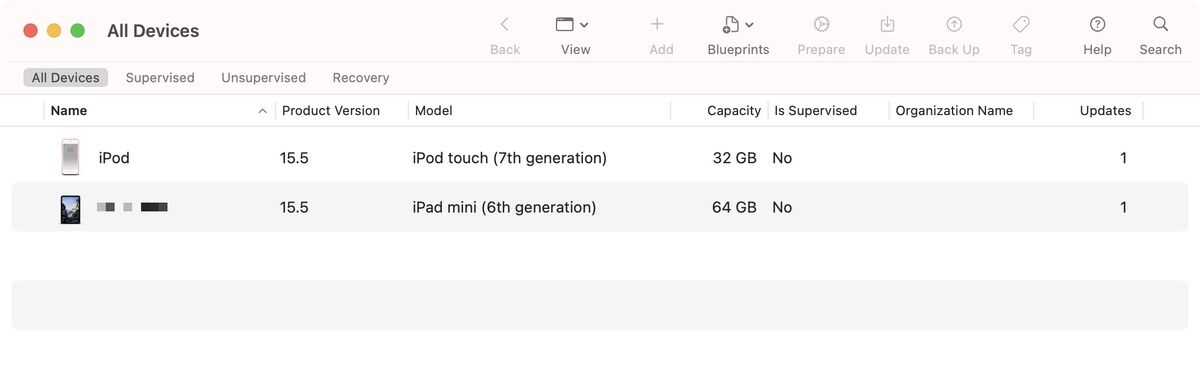
You may double-click the device whose UDID you want to check, and the device details screen will appear.
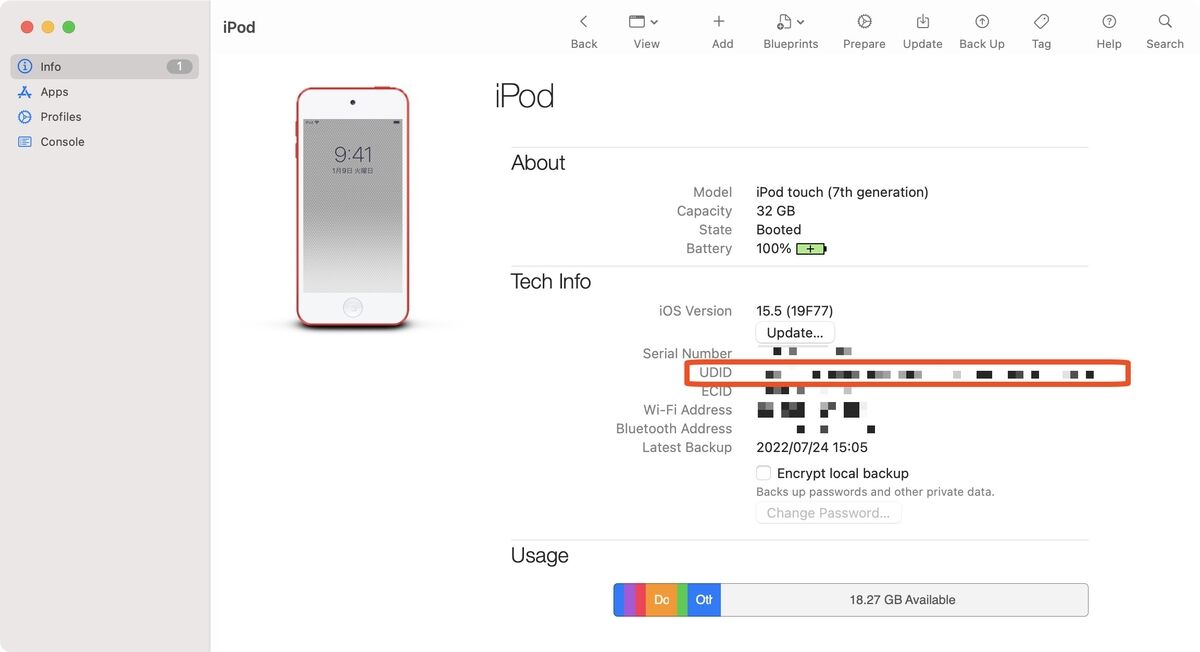
The UDID is the red rectangle on this screen. You can select it as text by double-clicking it. Also, you can use the shortcut [command] + C or the right-click menu.
(5) Finder (Mac)
If Apple Configurator isn’t installed on your Mac, we recommend using the Finder.
You may connect the iOS device to your Mac via USB and click the device in the sidebar of the Finder. The following device information screen will display.
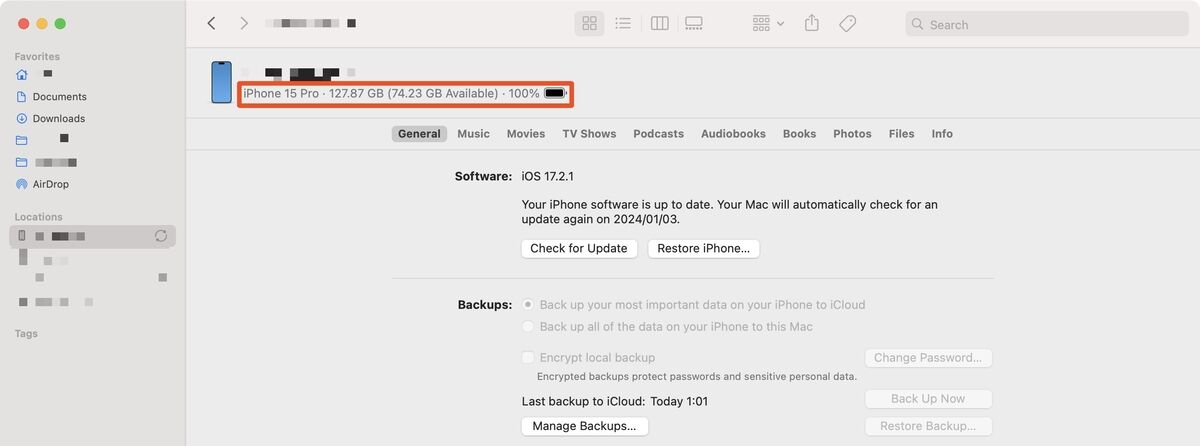
(Since macOS Catalina, the iOS device information screen and various operations to the device have been integrated into Finder.)
On this screen, click the red rectangle area in the above figure to switch to the serial number and UDID.

Further, by right-clicking, you can copy only the UDID as text.
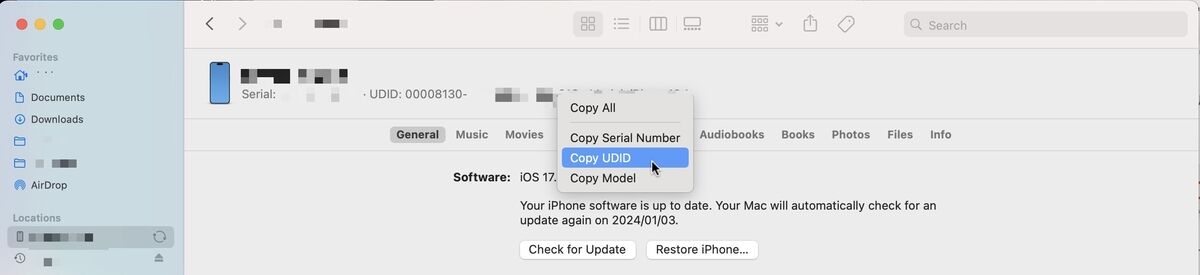
This method is the easiest way to find the UDID for those who are not IT Department staff or developers using Catalina or later Macs.
(6) Music (Mac)
As with the Finder, you can also check the UDID in the Music application.
You may launch the Music and select the device you wish to check UDID from the “Devices” on the sidebar. You will see a window like the following. (If you have downloaded and installed songs, a list of songs will be displayed.)
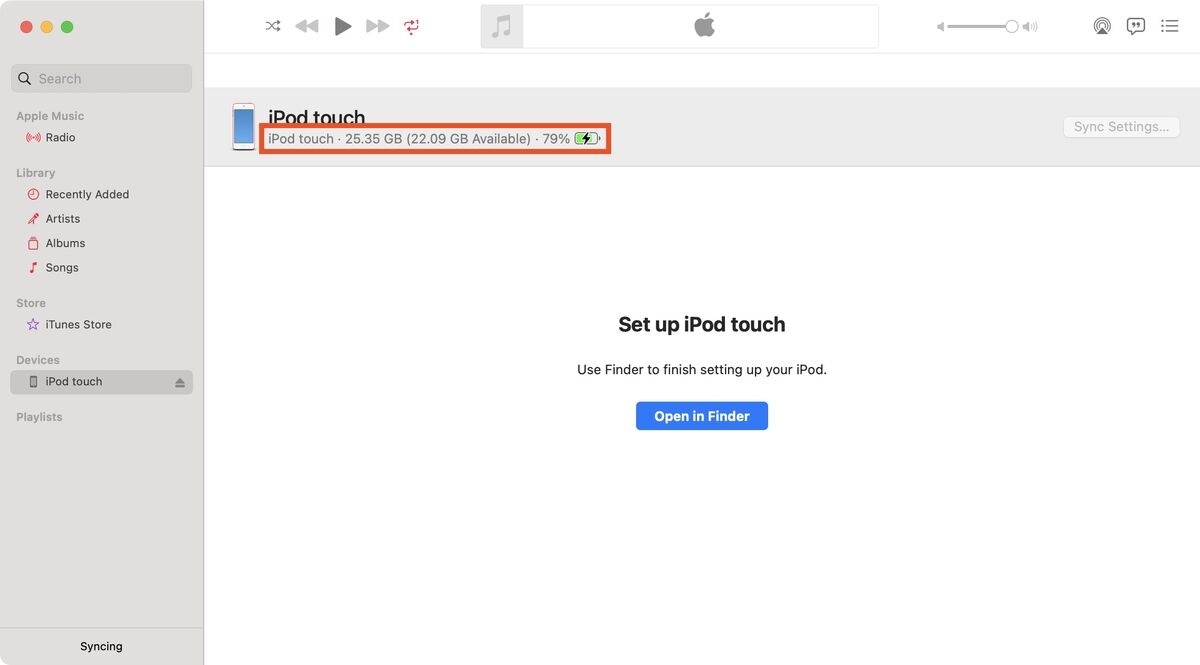
(Detailed information will not be displayed for a device that has not completed the AppleID setting.)
As with the Finder, clicking the red rectangle displays the serial number and UDID.

(You can copy the UDID by right-clicking on it as text.)
However, although we have introduced this method, Finder is more common, so we don’t think you should look it up using the Music app.
(7) System Report (Mac)
You can also check the UDID from the “System Report”, which provides detailed information about your Mac.
With the device connected to the Mac via USB, go to the Apple menu and click [About This Mac] > [More Info] > [System Report] button.
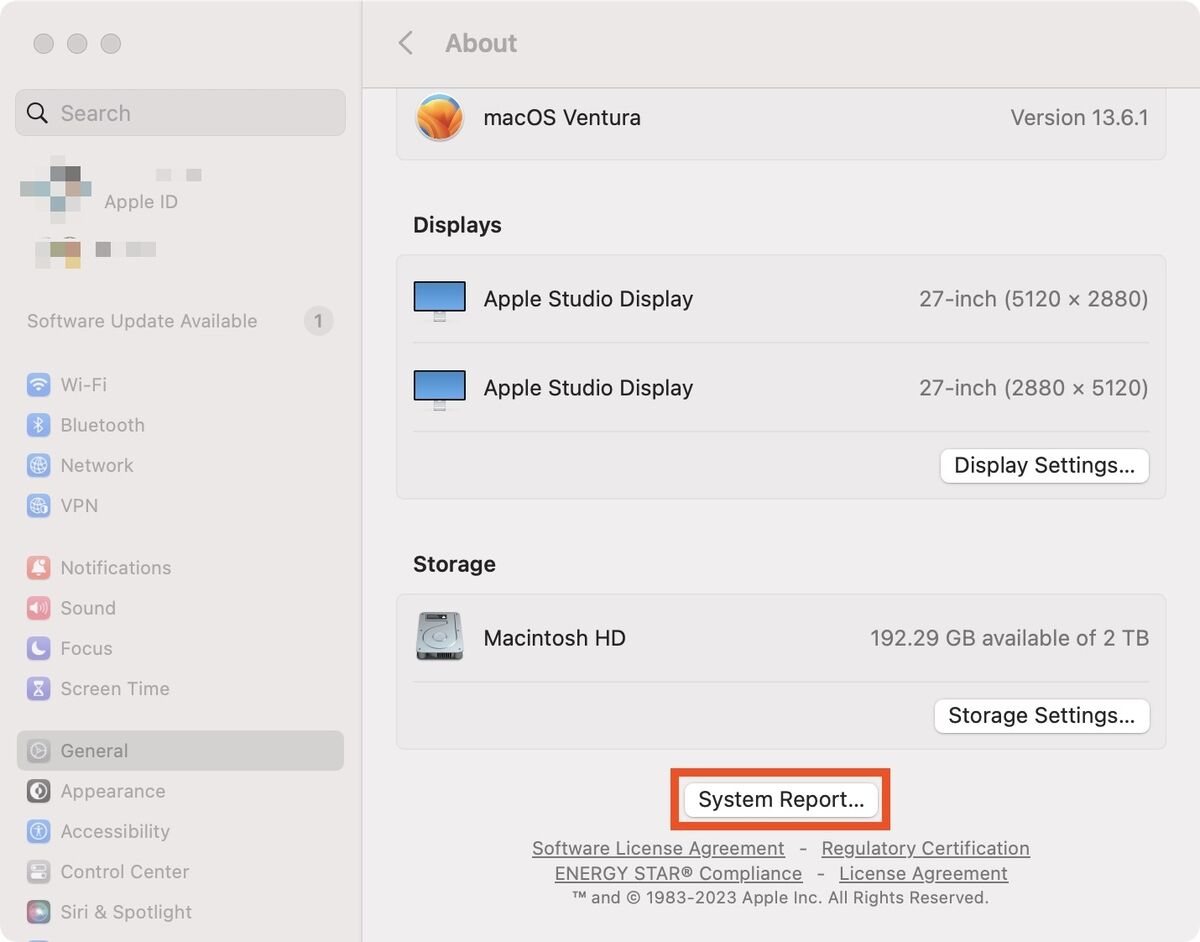
The System Report will display. Click on Hardware USB in the sidebar and select your iOS device from the list.
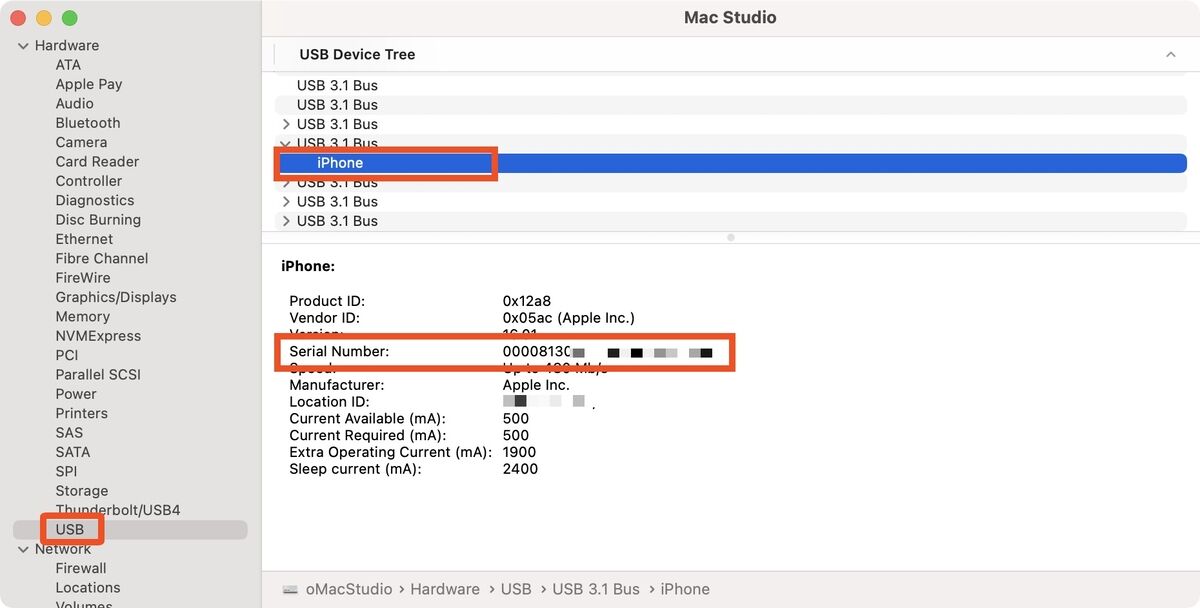
The UDID will be displayed in the “Serial Number” field in the lower right pane. (Note that the name is confusing.)
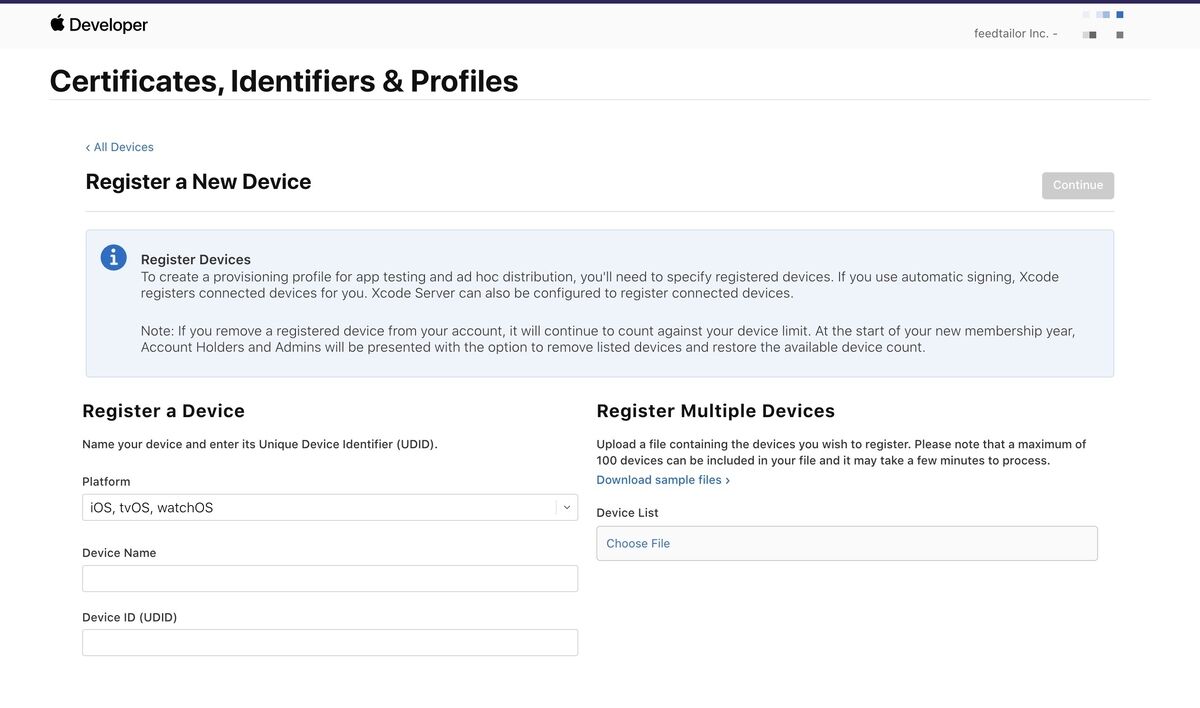
Note that the UDID displayed in the System Report omits the hyphen in the middle if the device’s UDID is in the new format (00000000-0123456789ABCDEF 8-16 digit format). If you are in charge of registering UDIDs on developer.apple.com for AdHoc distribution, please include a hyphen between the 8th and 9th digits when registering.
(8) iTunes (Windows)
To check the UDID in a Windows environment, you may use iTunes.
This method is relatively easy since it’s likely that most Windows PC and iOS users have iTunes installed. If you haven’t installed iTunes, please install it from the Microsoft Store URL or iTunes Downloads
First, you may connect your iOS device to your Windows PC via USB and launch iTunes. Then, clicking on the device icon displays its details.
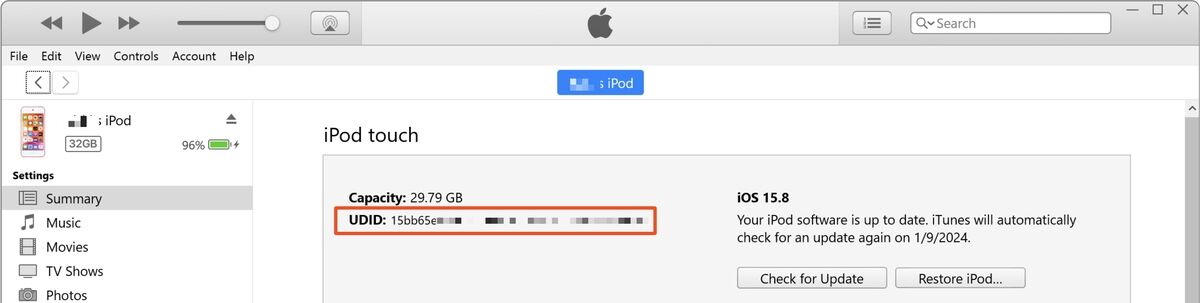
Each time you click on the red rectangle area, the text will change from ECID to serial number to UDID. Please click twice to display UDID and copy it as text.
Sometimes, iTunes does not recognize the iOS device. If this happens, try unplugging and plugging the cable or restarting iTunes or Windows.
(9) Device Manager (Windows)
You can also find UDID using the “Device Manager” on Windows. This method is exceptional, but we will introduce it here.
First, please right-click on the Windows menu and open [Device Manager]. The following screen will display. Then, please open “Universal Serial Bus Devices”.
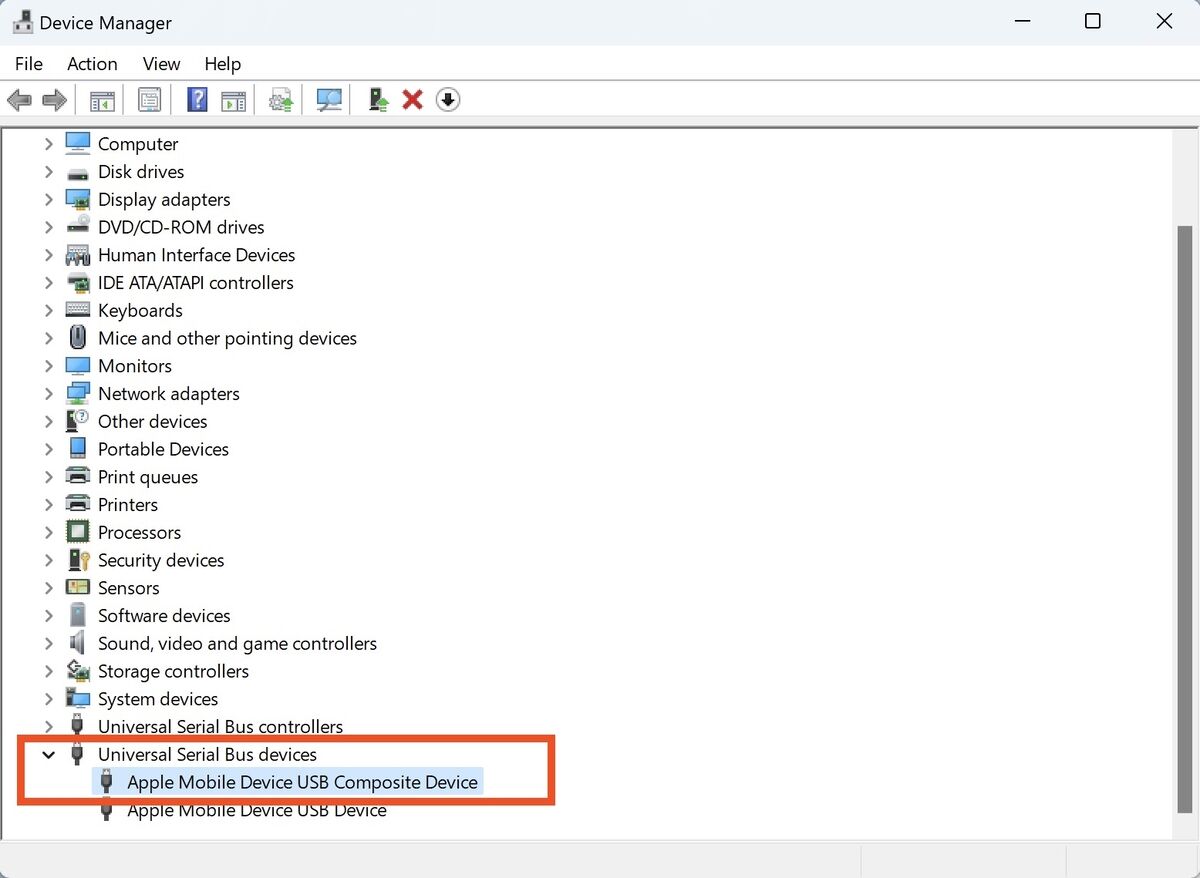
In “Universal Serial Bus Devices”, you will find “Apple Mobile Device USB Composite Device”. Please double-click this item or right-click it and click “Properties” to display the following dialog box.
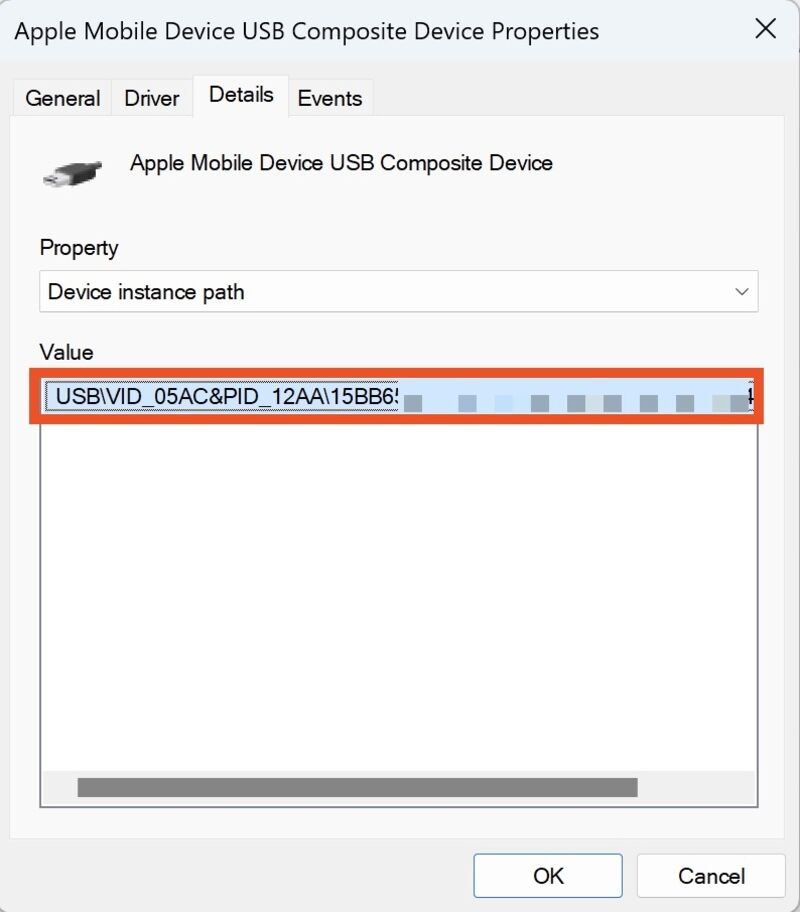
Next, you may select “Details” tab and switch the list box in the “Properties” to “Device Instance Path”, and you will see string separated by \ (backslash) mark in the value column. The right of the last \ mark in the string is the UDID.
Note that if the UDID is displayed in the new format (00000000-0123456789ABCDEF 8-16 digit format), the hyphen will be omitted. Please make sure to insert a hyphen between the 8th and 9th digits when registering at developer.apple.com.
(10) UDID.tech (Web)
There is a service that allows you to find out your UDID without the need for MDM, Mac, or Windows, just by visiting a website called UDID.tech.
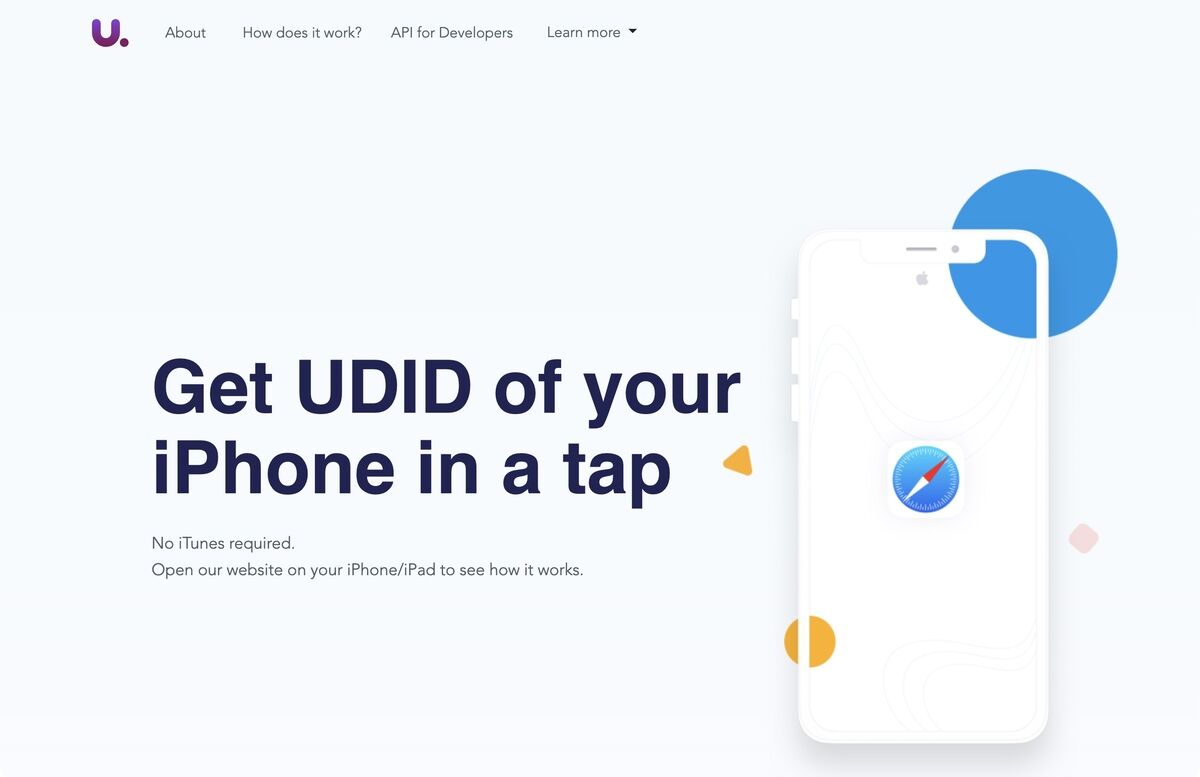
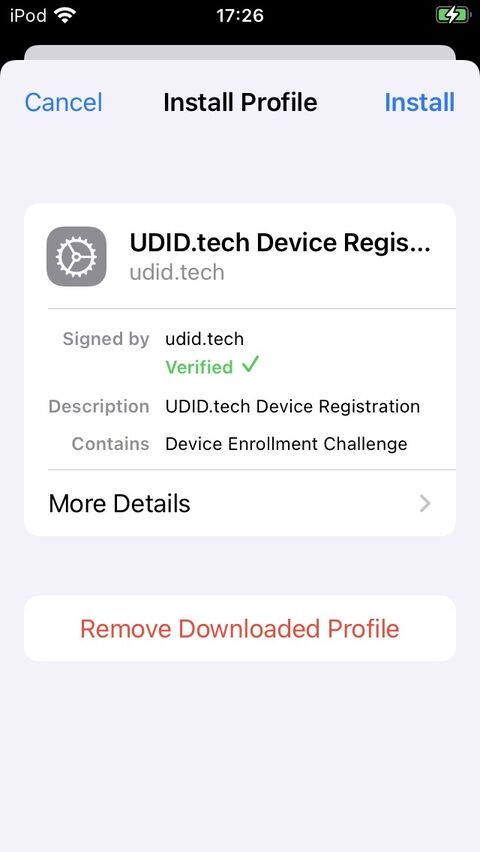
You can download a special profile if you access this site with Safari on iOS.


After installing the downloaded profile from the Settings app, the UDID will be displayed on the website.
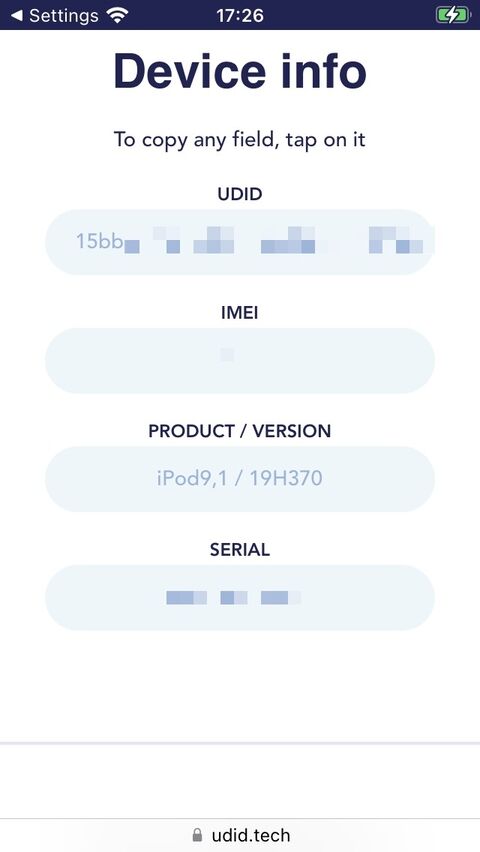
(Not only UDID but also serial number will be displayed. If your device is a cellular model, you can also see IMEI.)
This service, developed by Pixel Rainbow Inc. in the U.S., aims to simplify getting UDID.
You may think, “Isn’t there an API to get UDID now?” “How does this service get the UDID on the web?”. The About page of this site is as follows.
UDID.tech uses Apple Mobile Device Management concepts to provide you information about your device. The profile you install tells your iPhone, iPad, or iPod to send encrypted data (UDID, IMEI, Serial No, etc.) to your browser.
This service seems to be using the MDM protocol and not some hack or exploit of an iOS vulnerability.
Strictly writing, it uses the iOS behavior when a configuration profile with a special payload called Profile Service is installed. If you are interested in this, you may read the Apple official document Over-the-Air Profile Delivery and Configuration or analyze the configuration profile from this site.
By the way, anyone can create the same service as UDID.tech using the published specification. But we have yet to be aware of any similar site.
Conclusion: Use TestFlight for test distribution as much as possible
In this article, we have introduced ten ways to find the UDID. I suggest using them for AdHoc distribution in the development phase.
However, as of 2024, it is recommended to use TestFlight for test app distribution and avoid AdHoc distribution as much as possible. This is because UDID management becomes complicated, and it takes time to respond to problems such as “the app doesn’t work on this device !” or “can’t register more UDID on the Apple Developer site !”
Now that non-public business apps must be submitted as Custom Apps to the AppStore, there is no reason not to use TestFlight.
Although TestFlight may be confusing with its many technical words, such as internal and external tests, it is much easier to understand and use TestFlight than in 2014, when Apple first released it.
If you are still using AdHoc distribution for test distribution due to past practices, consider migrating to TestFlight now so you don’t have to worry about UDID collection.